Graham Cracker Gingerbread Houses: A Winter Family Tradition
For a number of years now, my family and I have been making fun, colorful, and pretty easy to assembly graham cracker gingerbread houses. It’s become quite the holiday tradition and inspires everyone to get involved and creative (and a bit competitive). If you’re looking for a fun family project during the holiday break or just when the weather is too bad to go out, read on!
We started our tradition back when my older daughter was almost 4. We used some food coloring in the icing to help with the decorating, since the only candy we had at the time was chocolate kisses. Two years ago, the weather was frigidly cold and everyone was cooped up inside, so we had planned ahead and upped the fun factor with more types of colorful candies. Last year, we were visiting family in Wisconsin from Christmas to New Year’s, so we decided to show the rest of the family the new tradition we’ve started. As long as you can find some graham crackers and candy and can whip up a bunch of icing (which is only 3 ingredients), you can make these houses anywhere.

The base for the houses has evolved since we first started, from a paper plate to a wooden board covered in paper. I prefer the board in case you need to move the houses (particularly if working on the dining room table). I’ve covered the board and secured the paper in a number of ways over the years. Personally, I prefer wax and parchment paper. The parchment covers the board the best, so it’s bright white and the wax paper on top allows us to scrape off any mistakes easily. I used my handy staple gun to attach them the first few years. Now in Wisconsin, we’ve used double sided tape, packing tape and even my favorite blue painter’s tape. SO…..why do I mention all this?? Because, the “formula” changes a bit from year to year depending on what’s available (and how much energy I have frankly) and it always works out lovely. So, find what supplies you have available and make them work. It’ll be just fine!! Promise!
So, gather up your supplies, it’s time to Ready, Set, Build! Add a bit of hot chocolate as you’ve got hours of afternoon fun for kids and adults!
For More Fun Winter Kids Crafts:
- Clothespin Snowmen
- Colorful Pipe Cleaner Caterpillars
- Glitter Glue Felt Creatures
- How To Make a Marble Run
Graham Cracker Gingerbread Houses
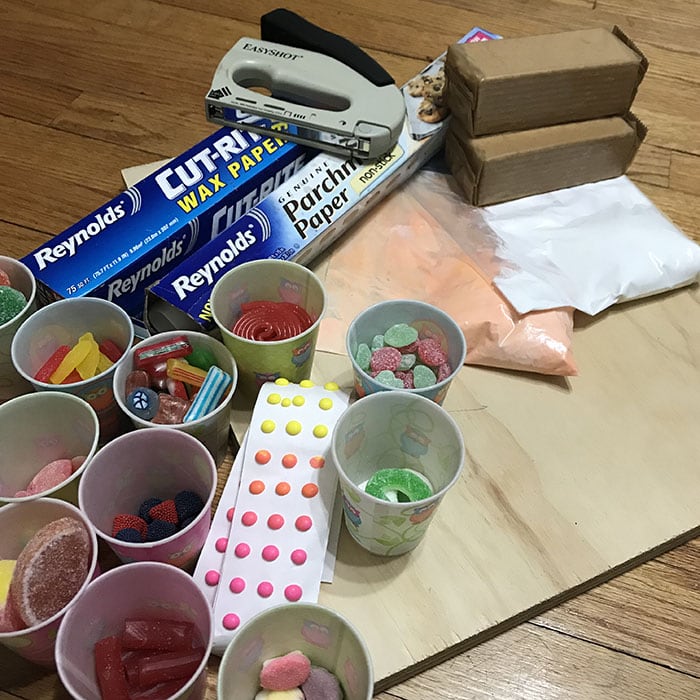
WHAT YOU’LL NEED:
- Graham Crackers
- Royal Icing in Quart-size Freezer Plastic Storage Bags (See Icing Tips below)
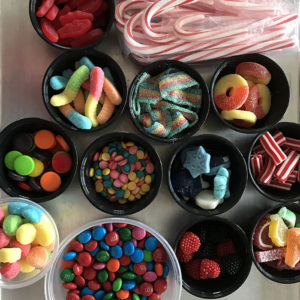
- Assorted Candy
- Parchment or White Paper (Option 1)
- Wax Paper (Option 1)
- Wood Board (Option 1)
- Staple Gun (Option 1)
- Sturdy Disposable Plates (Option 2)
CREATING The Base
1 (Option 1). First things first, the base for our gingerbread houses. Cut a few sheets of parchment paper and staple them to the board, followed by wax paper. Trim the edges with a scissors to make it look a bit neater. Base complete and ready for houses! (NOTE: If you have tape instead of staples, just fold the paper under the board and secure with the tape.)

1 (Option 2). If you do not have, or want to make, a board base, you can use sturdy paper plates.
MAKING The Icing
ICING TIPS:
- Royal icing is basically confectionery sugar and egg whites beaten together. Some recipes add vanilla while others add lemon juice or cream of tartar. We’ve used several different recipes, all with success and easily found on the internet, so find one that uses ingredients you have in your kitchen. It’ll get the job done! (We use a 3 egg whites, 4 cups confectionery sugar, and 1/2 tsp cream of tartar one right now)
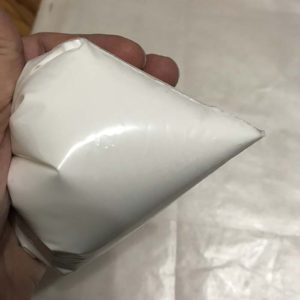
- Don’t skimp on the plastic bags. Get the Freezer ones, not storage or snacks. The extra durability comes in handy when you are squeezing on the bag to pipe out the frosting.
- Once the royal icing is made, it can be added to your plastic freezer bags. Grab some empty glasses and place the bags inside them with the tops folded over. It makes filling the bags super easy and less messy. If you are coloring the icing you can add the white icing to the bag along with the food coloring. Seal the bag and smoosh to mix.

2. Once the royal icing is made and put into plastic storage bags, push all of the icing down to one bottom corner and twist the bag to keep it there. Snip off the very tip of the bag.
ASSEMBLING THE House
3. Draw 2 icing lines on the board for the first 2 sides of the house. I like to use a graham cracker as a guide for the length of the lines.
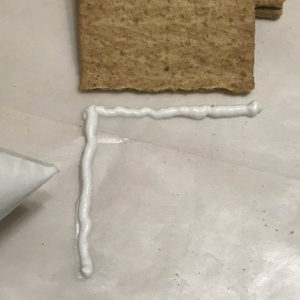
4. Take 2 squares of graham crackers and stand them up on the icing lines. While holding the 2 crackers, fill the seam between them with icing. You should be able to let go and have them stand on their own now.

5. Draw a third line on the ground to continue making a square. Since it will be tough to get the icing bag inside the square, there are 2 options I use to attach it to the rest of the house. Either: A) Put icing up the side of the square and when you place it on the line, “smoosh” the corners together like the pic below and then ice up the outside of the box to secure the seam OR B) Set the cracker on the third line and, while holding the cracker, put icing up the outside seam. I tend to start out doing A and then switch to B as I get more comfortable using the icing bag.
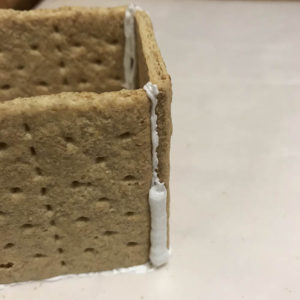
6. Add the fourth and final side of the house in the same way as you added the third.
7. Once the sides of the house are complete, apply a line of icing to the bottom of the box, right where the cracker meets the board. This will give the house some additional stability which will be really helpful when little hands start decorating. Also, add icing to the outside seam of the first 2 squares.
8. Now onto the roof. For this, you will need another 2 graham cracker squares. Apply icing to the top of the box (sides of the house) where the roof will meet and place the additional squares on the box. While holding the roof squares together, apply icing to the seam where they meet and again where each roof piece touches a side of the house. Notice the running theme of stability!
9. Once the box and roof of the house are complete you can decide to completely fill in the sides or leave the top triangle area open. Last year we left some open because my daughter liked to put toys in the houses (just note that they won’t be coming out for the while—until you adios the house). To make the triangle side piece, use a knife, preferably with a serrated edge, to cut away the extra cracker. You may need to shave down the sides of the triangle a bit to get it to fit in the house.
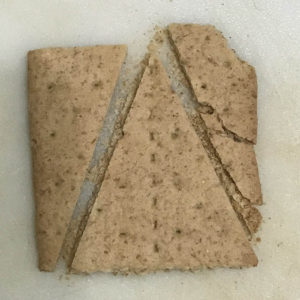
NOTE: I like creating the triangle side separate from the rest of the box because sometimes the cracker crumbles a bit like the pic below. It can always be filled in with icing, but its not really holding up the roof of the house. If it were, I would be going through a lot more graham crackers to get the cut just right.

10. Secure the triangle side by adding icing to outline of where the piece will be fitting in (notice the icing on the roof and box pieces). Pop the triangle into place and cover over the seams with more icing.
11. Make one or more houses on the board (a bonus of the board) and then pull out the candy and any additional icing bags. You are now ready to decorate your graham cracker gingerbread houses!

House Decorating
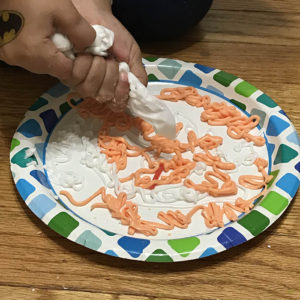
12. The decorating ideas are endless, so use your icing “glue” to create some fun houses.


NOTE: When you are finished decorating, and assuming you have any icing left, I found that little ones like to play with icing. Have a plate on hand, so they can explore their designs without messing with the gingerbread board.
Each gingerbread house may seem like a lot of steps, but once you get the hang of it, it goes pretty quickly! Have fun building your own graham cracker gingerbread houses (or village).