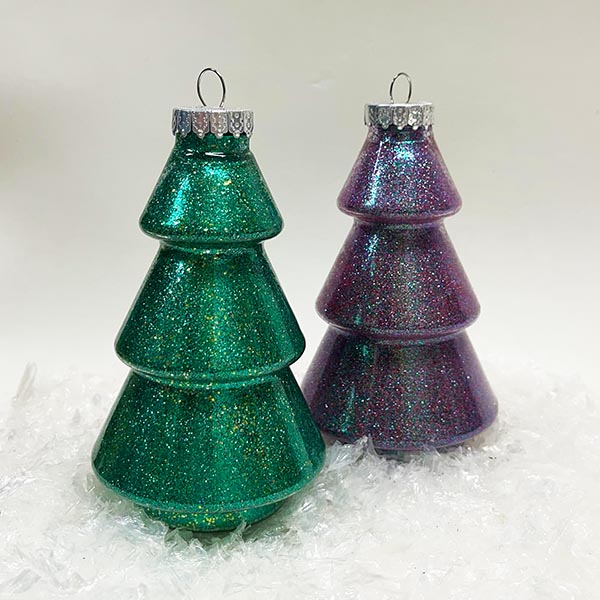
Glitter Ornaments: Create Easy Beautiful Custom Ornaments
This holiday I was looking an easy, fun, colorful ornament DIY that my daughters and I could do and give as gifts to friends, family, and teachers. These glitter ornaments definitely check all of the boxes, especially since my family LOVES glitter!
Since we can never do anything just simply, we played with 3 different variations of glitter ornaments: single color, blended colors, and gradient color (more details and step-by-step instructions below). We also tested out glues and types of glitter to see what would produce the best results.

What kind of glue do you use to make glitter ornaments?
We tried several types of glues to adhere the glitter to the ornament (craft glue, Mod Podge, DuraClear Varnish) and the DuraClear was the winner by far. It was thin enough to cover easily and the glitter stayed on the ornament long after being dry without being see-through. I would also note that we did not try the floor polish that you see on some tutorials out there because I like to stay away from things that have fumes if possible (as we are doing this in the basement).
Should I use extra fine or fine glitter for glitter ornaments?
This is a personal preference as both fine and extra fine glitter work for a variety of ornament shapes. The extra fine glitter gives a glistening, shimmer effect. The fine glitter is a bit more disco ball feel, but both are very pretty (in my opinion). Check out the pic below for a comparison.

CHECK OUT MORE DIY CHRISTMAS ORNAMENTS:
- How To Make Cute Button Christmas Ornaments
- How To Make Glitter Light Bulb Ornaments
- Rhinestone Ornaments: Easy to Make, Inexpensive, and Kid-Friendly
Glitter Ornaments
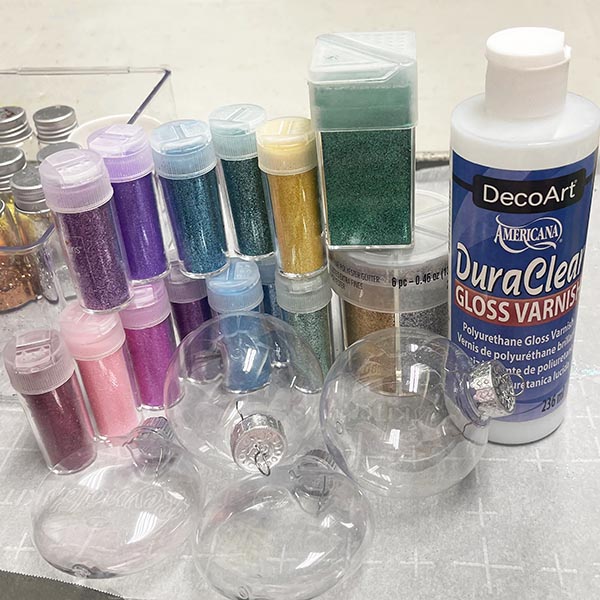
WHAT YOU’LL NEED:
- Extra Fine Glitter/Fine Glitter
- Clear Plastic Ornaments (Round, Onion, Disc)
- DecoArt DuraClear Gloss Varnish
- Small Paper Cups
- Parchment or Craft Paper for covering your workspace or a tray
PREPPING THE GLITTER
As I mentioned above, you have a few glitter options, so its best to decide and prep, if needed, before you coat the ornament with varnish:
- Single Color – This is the easiest because you just pick a color of glitter and use that.
- Blended Color – I love this option because its super simple, but creates a much richer, more interesting color that just a single one. For a more subtle blend, grab colors that are close together like light and dark green or a copper and a bronze. For more unexpected combinations (which my kids LOVE to do!) you can put almost anything together and create something interesting.
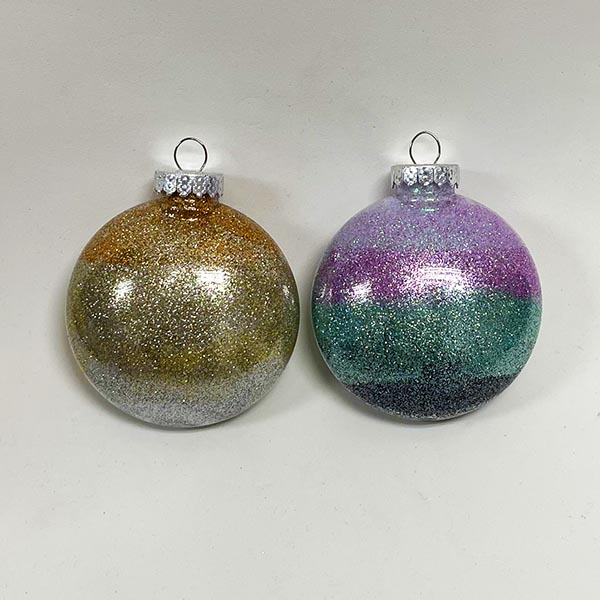
- Gradient Color – Select a few colors that you use to create the gradient. I would suggest 2-4 colors as any more is really tough in a small ornament. The tutorial for the gradient glitter ornament is below.
GLITTER TIP: Before you start working with any glitter project, put paper (I like parchment) in a tray, so the possible glitter mess is controlled. If you do not have a tray, cover your work surface with paper or plastic for easy clean up. Everything in this step-by-step was done in a tray.
1. Once you’ve decided on the color option, pick the color(s) and set aside. If you are blending colors, pour the colors into the small paper cup and swirl gently to blend and add more color until you get something you like.

COATING ORNAMENT IN VARNISH
2. Remove the top cap on the ornament and set aside. Add a generous amount of varnish to the inside of the ornament and slowly rotate the ornament around to start coating it. As you rotate and see that the varnish is coating, start to gently tilt the ornament (while rotating).
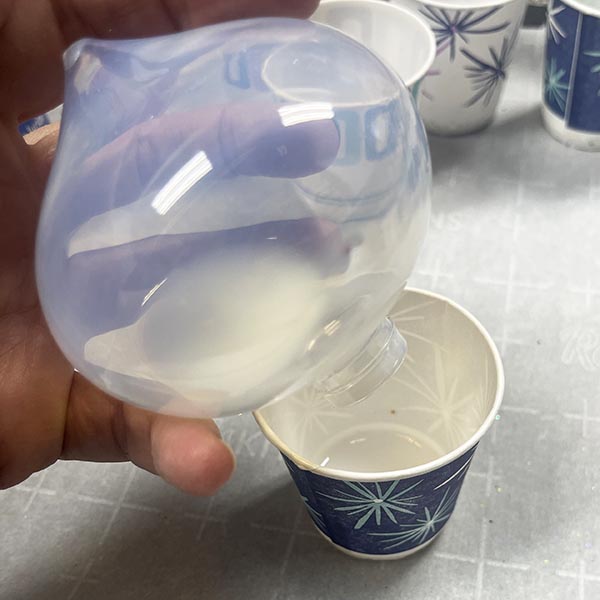
3. When you have almost tilted the ornament upside down, use a paper cup to catch the excess varnish and then hold the ornament while any extra drips out. NOTE: You want the ornament completely coated, but too much extra will just make the glitter slide and clump together inside. Let the ornament sit for 2-4min.

ADDING SINGLE AND BLENDED GLITTER TO ORNAMENT
4. After letting the ornament sit, tip it back over and pour a generous amount of the glitter into the ornament (for single and blended). You can put your finger over the opening and shake it, but I prefer to swirl the ornament to start coating it with glitter (like with the varnish) and then shake when I get towards the top.
5. Once the inside is coated, tip the ornament back into a cup to shake out the extra glitter.
6. Leave overnight to dry and then put the top cap back on.
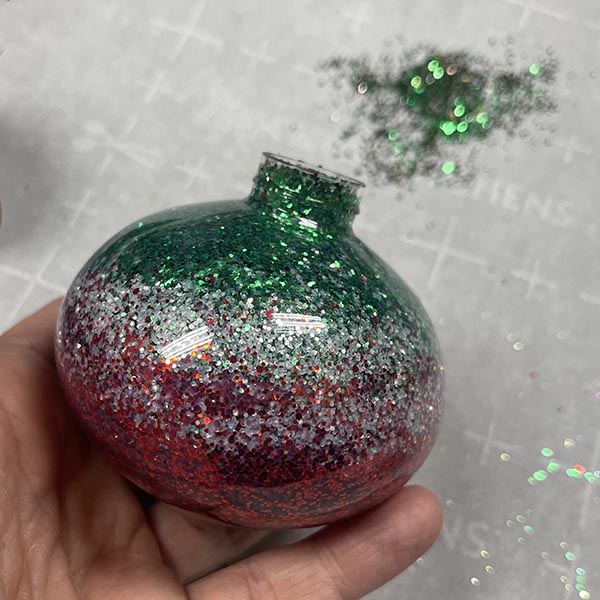
CREATING GRADIENT GLITTER ORNAMENT
7. For the gradient, add the color that you want at the bottom of the ornament. Start with very little, so you can control it easier (you can always add more).

8. Gently swirl the glitter around to coat as much of the bottom as you want. TIP: Regularly stop and look at where the color is to see what still needs to be covered. Add more glitter as needed (less is better because you CANNOT pour the excess out).

9. To transition to the next color smoothly, add a bit of bottom color and the next color and gently shake to blend. Again, gently swirl to slowly add the color up the ornament. Once the blended colors are gone add just the second color to create that layer.
10. Repeat step 9 for any additional colors.
11. Once the inside is coated, tip the ornament back into a cup to shake out the extra glitter.
12. Leave overnight to dry and then put the top cap back on.

And there you have it! Super easy, quick and inexpensive glitter ornaments! My daughters and I created 2 dozen in no time. They will make great gifts for friends, family and teachers this Christmas! I hope you enjoy!
Happy holidays and happy crafting! ~ Nikole